2018年12月18日 星期二
Keil C: Warning: #1296-D: extended constant initialiser used"?
The root cause is miss use a pointer to a static variable like:
int x = 1;
int y = (int) &x;
Modify version
int x = 1;
int *y = &x;
printf("%p\n", &x); // memory address of x
printf("%p\n", &y); // memory address of y
printf("%p\n", y); // y = memory address of x
printf("%d\n", *y); // *y = memory content of x = 1
Addresses are not arithmetic types in ANSI C spec, so if need to get the address of a static variable, use a pointer point to the variable's address.
Ref :
1. http://infocenter.arm.com/help/index.jsp?topic=/com.arm.doc.faqs/ka15182.html
2.https://openhome.cc/Gossip/CGossip/Pointer.html
2018年8月1日 星期三
CC2640: Bus fault exception error on AuxAdiDdiSafeWrite function
Temporary solution : Disable the Power Saving feature on your project and rebuild both stack and app project.
My BLE stack version is 2_02_01_18, TI RTOS CC26xx version is 2_20_01_18, XDC tool version is 3_32_00_06
I guess the reason of this error is cause by the power constrain setting and peripheral issue, because the power initial code in [9], but I am not very sure since I didn't go deep in this problem now.
Some related source:
1.CC26XX Driver lib document:AuxAdiDdiSafeWrite
2.CC2640: Bus fault after random number of packets received to cc2640
3.CC2650调试问题
4.CC2640 - Sensor Controller power consumption
5.hard fault in CC3200 I2C
6.I2C Peripheral Setup Causes a processor Force Hardware Fault
7.RTOS/CC2640: Hard Fault: FORCED: BUSFAULT: PRECISERR.Data Access Error.
8.Hard Fault: FORCED: BUSFAULT: PRECISERR.Data Access Error
9.CC2650 as I2C Slave
Reason?
- CC2640如何在打开PowerSaving模式下唤醒并操作uart?
- RTOS/CC2640: Unresponsive in power saving mode
- CC2640 UART With Power Saving
- Power Managementfor CC26xx SimpleLink Wireless MCUsUser’s Guide
- Where and why the SMPH0 reset error (keep 0) did not release
2018年7月30日 星期一
Unsigned and signed shift:logical shift and arithmetic shift
In C, we usually use left shift and right shift operation << and >> to operate multiple / divide to variable with power of 2,ex: 4<<2 = 16
But when we use the signed variable and the shift operation we must consider the singed bit.See the below example code.
Since the C language support the arithmetic left shift and logic right shift, we must consider the signed bit to avoid some bug in code.
Ref:
1.Logical Vs. Arithmetic Shift
2.C语言中的逻辑右移和算术左移
2018年5月28日 星期一
CC2640: Merge app and stack hex file
1. Install Python2.7
2. Open cmd.exe type > pip install intelhex

3. Use below instruction to merge your hex file
2. Open cmd.exe type > pip install intelhex

3. Use below instruction to merge your hex file
2018年5月13日 星期日
GO: Development a simple windows GUI use lxn-walk package(2) -- Combobox and Button
1.Create the project folder and win_gui_v1.go in your go work space
> cd ..\src\
> mkdir win_gui_v1
2.Copy the .manifest file and modify to your_execution.exe.manifest

3.Code
3.Result

Ref:
1. Go实战--使用golang开发Windows Gui桌面程序(lxn/walk)
2. ComboBox 類別
3. lxn/walk/examples
> cd ..\src\
> mkdir win_gui_v1
2.Copy the .manifest file and modify to your_execution.exe.manifest

3.Code
3.Result

Ref:
1. Go实战--使用golang开发Windows Gui桌面程序(lxn/walk)
2. ComboBox 類別
3. lxn/walk/examples
2018年5月6日 星期日
GO: Development a simple windows GUI use lxn-walk package(1) -- Getting start
"Walk is a "Windows Application Library Kit" for the Go Programming Language.
Its primarily useful for Desktop GUI development". In this series I try to build a simple terminal program to commnunicate via COM port.
1. Getting start
> go get github.com/lxn/walk
2. Build the example
> cd ..\src\github.com\lxn\walk\examples\imageviewer
> go build
3. run the imageviewer.exe
Its primarily useful for Desktop GUI development". In this series I try to build a simple terminal program to commnunicate via COM port.
1. Getting start
> go get github.com/lxn/walk
2. Build the example
> cd ..\src\github.com\lxn\walk\examples\imageviewer
> go build
3. run the imageviewer.exe

Ref:
1. l/walk
GO : List all the serial port in windows use golang-sys package
We can easily get all the serial port in windows using regedit.exe

In our application we read the windows register key `HARDWARE\\DEVICEMAP\\SERIALCOMM` through windows API and list all the sub key and value.

In our application we read the windows register key `HARDWARE\\DEVICEMAP\\SERIALCOMM` through windows API and list all the sub key and value.
Github project: win_serial_console
2018年4月2日 星期一
CC2640:Change RF front end mode and bias
1. In ../main.c define your own BLE configuration template.
2.The option and default configuration is define in ../ble_user_config.h
The internal bias and external bias is determine by the RX_TX pin, which didn't implement in 7x7 package.In our application we use the CC2592 as PA and use 5x5 package for smaller footprint, and the configuration is differential mode internal bias.
Ref:
1.CC26xx HW Training : RF Front End options and Antennas
2.CC2640 在 Beacon 应用中的实现方法
3.CC26x0 SimpleLink™Bluetooth®low energy Software Stack 2.2.xDeveloper's Guide
2018年1月17日 星期三
CC2640:Use System_printf in project.
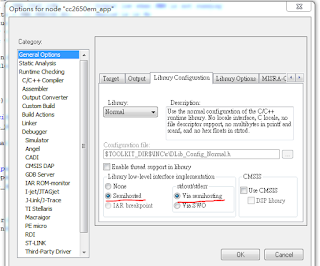
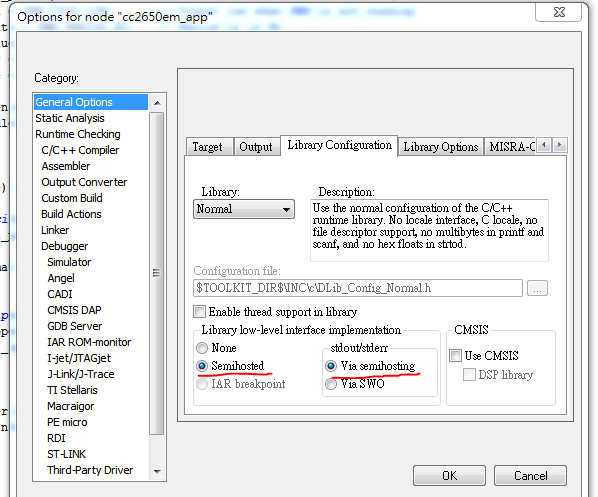
1.I use IAR as IDE to develop CC2640 BLE project and XDS100V3 as debugger.First make sure enable the Semihosted and Via semihosting in General Options.
 2.Add below code in app_ble.cfg file.
3.Add include header file and test.
4.In debug mode enable View->Terminal I/O and we can see the Hello World! in terminal.


Ref:
1.System_printf and printf() on CC2650 sensorTag
2.System_printf supported format specifications
3.Add include header file and test.
4.In debug mode enable View->Terminal I/O and we can see the Hello World! in terminal.


Ref:
1.System_printf and printf() on CC2650 sensorTag
2.System_printf supported format specifications
訂閱:
意見 (Atom)
-
The root cause is miss use a pointer to a static variable like: int x = 1; int y = (int) &x; Modify version int x = 1; int *y =...
-
 1.Download Astyle http://astyle.sourceforge.net/ 2. Open Keil -> Tool -> Customize Tool Menu config as below My argument. Can ...
 -
 We can easily get all the serial port in windows using regedit.exe In our application we read the windows register key `HARDW...